Projectile Motion Lab
Introduction: This lab was used to further the understanding of how projectiles move. Various materials were available, and the assignment was to create a lab using the provided materials.
Objective: The objective of this lab is to calculate the x distance (how far the projectile moves).
Hypothesis: What is the projectile's horizontal distance? The theoretical and experimental distance should be fairly close provided there is minimal error in the execution of the experiment. Obviously the experiment will not be perfect, but hopefully it will be close.
Materials:
Marble
Track for said marble
Table
2 Photogates
LabQuest
Connector Cords
Tape
Poster Paper
Expo Marker
Procedure:
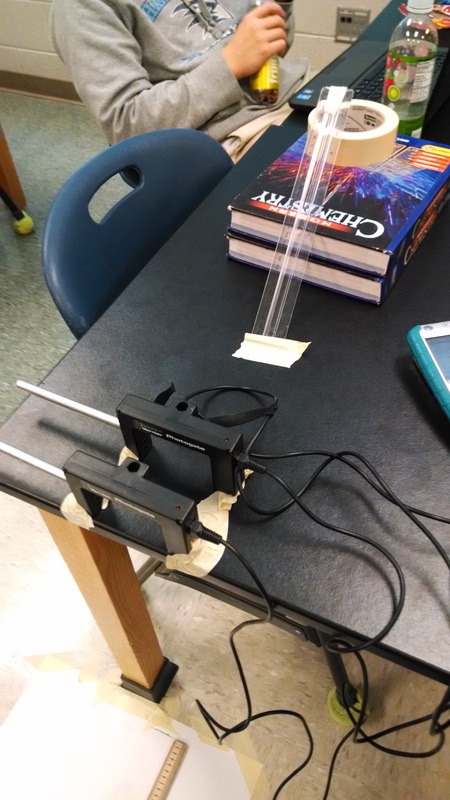
1. Set up the track, do not set it up on the very edge of the table
2. Using the cords, attach the LabQuest to the Photogates
3. Position one photogate at the end of the track, and the other one at the edge of the table
4. Position marble at the top of the track and let go
5. Record the velocity of the marble and the x distance
a. Record x distance by taping poster board (white works best) to the ground, color marble in black expo marker, let marble go and there should be a black mark where the marble hits the poster board.
6. Calculate the theoretical x distance (using the equation dy=.5gt^2 to get the time and then dx=vx*t to get the x distyance), then compare the theoretical distance with the experimental distance.
Data Table:
Objective: The objective of this lab is to calculate the x distance (how far the projectile moves).
Hypothesis: What is the projectile's horizontal distance? The theoretical and experimental distance should be fairly close provided there is minimal error in the execution of the experiment. Obviously the experiment will not be perfect, but hopefully it will be close.
Materials:
Marble
Track for said marble
Table
2 Photogates
LabQuest
Connector Cords
Tape
Poster Paper
Expo Marker
Procedure:
1. Set up the track, do not set it up on the very edge of the table
2. Using the cords, attach the LabQuest to the Photogates
3. Position one photogate at the end of the track, and the other one at the edge of the table
4. Position marble at the top of the track and let go
5. Record the velocity of the marble and the x distance
a. Record x distance by taping poster board (white works best) to the ground, color marble in black expo marker, let marble go and there should be a black mark where the marble hits the poster board.
6. Calculate the theoretical x distance (using the equation dy=.5gt^2 to get the time and then dx=vx*t to get the x distyance), then compare the theoretical distance with the experimental distance.
Data Table:

Analysis/Calculations: Using the formula dy=.5gt^2, you can find the time. My y distance (the height of the table or whatever you're launching your projectile from) was 75 centimeters, or .75 meters, and g (gravity) is 9.8 meters per second. So now you have .75=.5*9.8*t^2, so you can now solve for t (time). First you multiply .5 and 9.8 to get 4.9, so you have .75=4.9t^2, so you divide .75 by 4.9 to get .153=t^2. Now you just have to find the square root of .153, which is .391, so your time is .391 seconds. Now you can solve for your x distance using the formula dx=vx*t. You have your time and your vx is the velocity measured by the photogates. For trial one vx is 1.14. From there you just have to multiply 1.14 and .391 to get .45 meters (the theoretical distance for trial one). Next you multiply 1.135 and .391 which equals .44 meters, the theoretical x distance for trial 2. Finally multiply 1.28 with .391 and 1.118 with .391 to get .44 meters for the third and fourth trials. Throughout these trials, you would have been measuring the distance that the marble covered with the expo marker covered marble and poster board. In the data table above the theoretical and experimental x distances are written clearly for each trial, so it is very easy to compare them.
Conclusion: This lab was successful. The experimental and theoretical x distances were only 1 or two centimeters apart on any given trial. All of the hypothesis questions were answered with very little error. This lab was created so that I could get experience in creating my own question and form a lab using only the given materials to answer the previously stated question. This lab was also done to help better my understanding of projectile problems. I had to use two different formulas to get to my final x distance answers. This lab has shown that you don't always have all the variables you need to begin with. You may have to do a few extra steps to get to where you want to be, so this lab has taught that you also have to actually think and figure out a solution to your problem as it may not always be the most direct.
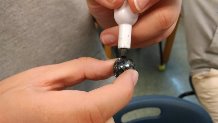
Pictures:
Conclusion: This lab was successful. The experimental and theoretical x distances were only 1 or two centimeters apart on any given trial. All of the hypothesis questions were answered with very little error. This lab was created so that I could get experience in creating my own question and form a lab using only the given materials to answer the previously stated question. This lab was also done to help better my understanding of projectile problems. I had to use two different formulas to get to my final x distance answers. This lab has shown that you don't always have all the variables you need to begin with. You may have to do a few extra steps to get to where you want to be, so this lab has taught that you also have to actually think and figure out a solution to your problem as it may not always be the most direct.
Pictures: